How to Break In a Generator for Your Travel Trailer: The Complete Guide
You just brought home a new generator for the RV. It’s tempting to fill the tank, fire it up, and plug in the air conditioner on the first trip. Don’t.
The next few hours of run time will do more to determine how long that generator lasts — and whether your warranty stays valid — than almost anything else you do with it. This guide walks through exactly what break-in is, why it matters, and how to do it correctly for the small portable and inverter generators most travel trailer owners run.
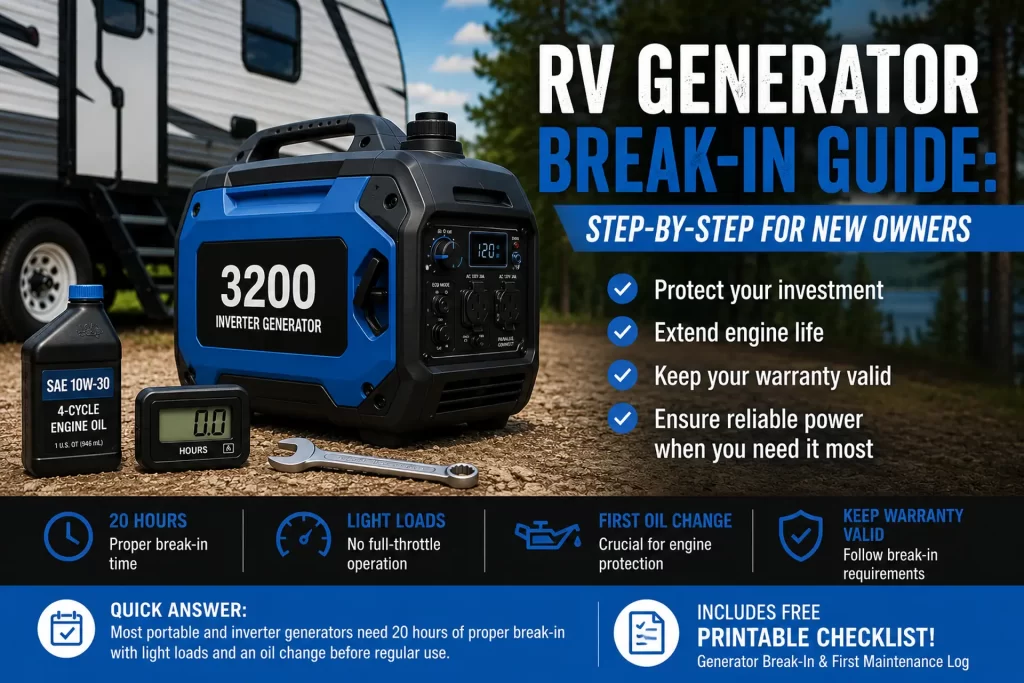
Quick Answer: Most air-cooled portable and inverter generators need 20 hours of gentle break-in running before their first oil change, with light to moderate loads only and no full-throttle operation. After that first oil change, the engine is considered broken in and can be used normally, including running the RV air conditioner.
Before putting your generator under full load, make sure it’s properly sized for your RV. Our RV Generator Sizing Guide explains how much power different travel trailers and air conditioners actually require. Always confirm the exact hours and oil type in your owner’s manual — requirements vary by manufacturer and engine size.
Before You Start: This guide covers general break-in practices that apply to most small gasoline and dual-fuel generators used with travel trailers. Your specific model’s manual is the final authority. If your manual’s break-in instructions differ from anything here, follow your manual — it reflects the exact engine tolerances your manufacturer built and tested.
Why Generator Break-In Actually Matters
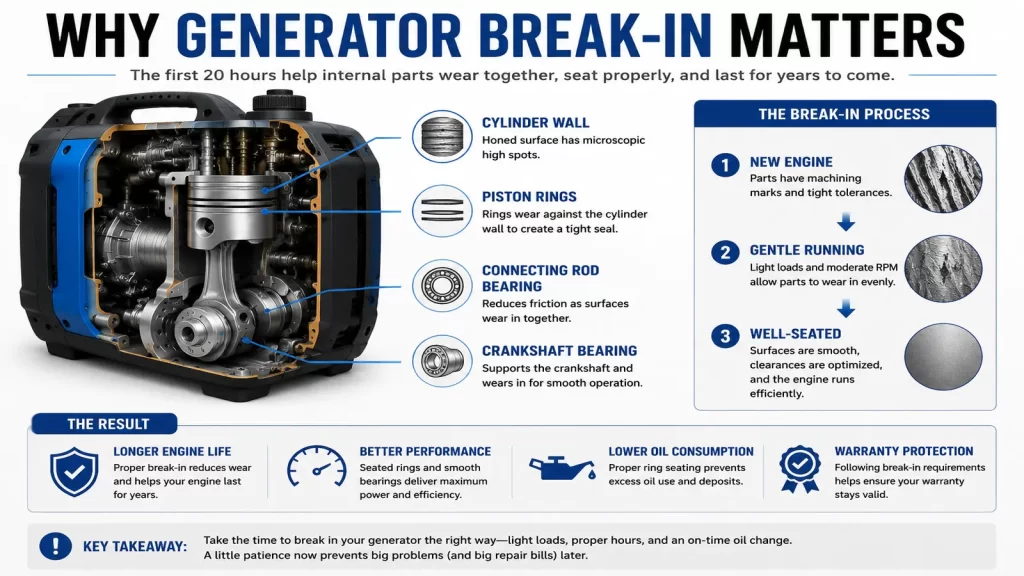
A new engine isn’t a finished product the moment it leaves the factory. Internal parts — piston rings, cylinder walls, bearings, camshaft lobes — are manufactured to close tolerances, but they still have microscopic high spots from machining. Break-in is the process of running the engine gently enough that these surfaces wear against each other and settle into a smooth, matched fit.
This matters in two specific ways for a generator engine:
Piston ring seating. The piston rings need to seat against the cylinder wall to create proper compression and oil control. If the engine is run too hard, too soon, the rings can glaze the cylinder wall before they’ve fully seated — a mistake that’s essentially permanent. A glazed cylinder wall causes oil consumption and reduced power for the life of the engine.
Bearing and clearance wear-in. Crankshaft and connecting rod bearings, along with other moving parts, need a period of light loading to wear in evenly. Heavy load or high RPM before this happens increases the risk of premature wear.
The first oil change is just as important as the running-in period itself. Break-in generates metal particles as surfaces wear against each other, and that first oil carries them away. Draining it out — rather than leaving it in for months — is one of the single most protective things you can do for a small engine.
In short: break-in lets the piston rings and bearings wear in evenly under light load, and the first oil change removes the metal particles that process generates. Skip either step, and the effects — oil consumption, lost power, a shorter lifespan — tend to show up gradually rather than all at once.
Why This Matters More for Small Engines, Not Less
It’s tempting to assume a small 200–400cc generator engine is too simple to need the same care as a car engine. The opposite is closer to the truth. Small air-cooled engines run at higher RPM relative to their size, have less oil volume to buffer heat and friction, and use simpler cooling systems with less margin for error. There’s also less material to work with — a cylinder wall on a small engine has less tolerance for a mistake than the equivalent surface on a larger, liquid-cooled automotive engine. The stakes of getting break-in right are, if anything, higher on the generator sitting in your RV’s storage bay than on the tow vehicle pulling it.
What Happens If You Skip Break-In
Skipping or rushing break-in doesn’t always cause an immediate failure, which is exactly why it’s easy to underestimate. The more common outcome is a generator that runs fine for a while but shows:
- Higher oil consumption than the manual predicts
- Reduced power output over time
- Harder starting as compression drops
- A shorter service life overall, even with regular maintenance afterward
There’s also a warranty dimension. Many manufacturers require proof of the first scheduled oil change and adherence to break-in guidelines as a condition of engine warranty coverage, and improper break-in is a commonly cited reason small-engine warranty claims get denied — confirm your specific model’s requirements in its warranty documentation.
Before the First Start: A Pre-Break-In Checklist
A few checks before the first pull of the cord (or press of the button) prevent avoidable problems.
Tip: Do this checklist somewhere with good ventilation — a driveway or open campsite, never a garage with the door closed, and never inside or under an RV.
- Check the oil level. Most generators ship dry or with only a small amount of break-in oil. Fill to the correct level with the oil type specified in your manual (typically 10W-30 for general use, though some manufacturers specify differently for extreme temperatures).
- Check the air filter. Confirm it’s seated properly and free of shipping debris.
- Inspect fuel lines and connections. Look for anything loose or damaged from shipping.
- Use fresh fuel. Old or ethanol-heavy fuel can cause hard starting and isn’t a fair test of a new engine. E10 (10% ethanol) is generally fine if it’s fresh; avoid E15 or higher unless your manual specifically allows it.
- Read the break-in section of your manual specifically. Manufacturers vary — some specify a strict no-load period, others allow light load from the start. Your manual overrides general guidance.
- Not sure where to operate your generator safely? Before your first startup, review our Generator Safety Checklist to learn the correct placement, ventilation, and carbon monoxide precautions for RV camping.
Recommended Break-In Supplies
These inexpensive tools make the break-in process easier and help you keep your new generator in top condition for years to come.
Affiliate Disclosure: This section contains affiliate links. As an Amazon Associate, Trailer Generator Guide earns from qualifying purchases at no additional cost to you.
Having a few inexpensive supplies ready before you start will make the break-in process cleaner, easier, and more accurate.
| Item | Why You Need It |
|---|---|
| SAE 10W-30 Engine Oil | Use the oil type recommended in your owner’s manual for the initial fill and first oil change. |
| Oil Funnel | Makes filling the crankcase easier and helps prevent spills. |
| Oil Drain Pan | Safely catches used oil during the first oil change. |
| Hour Meter | Tracks engine hours so you’ll know exactly when to perform maintenance. |
| Fuel Stabilizer | Keeps gasoline fresh if the generator will sit between camping trips. |
| Nitrile Gloves | Helps keep your hands clean while changing oil and handling fuel. |
Editor’s Tip: These are inexpensive items that most generator owners will use throughout the life of their generator. Having them on hand before your first startup makes the break-in process much easier.
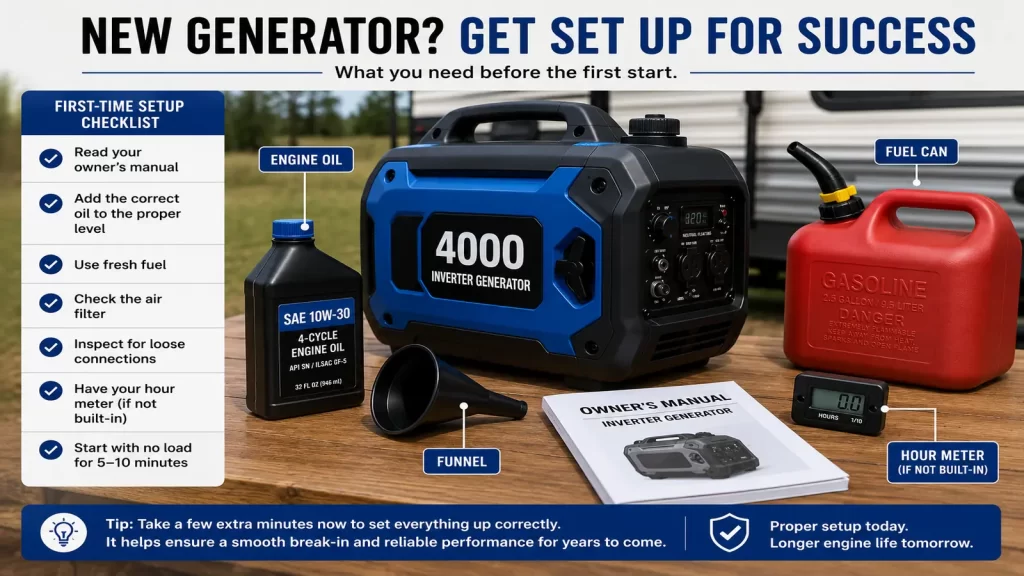
Editorial Tip: If your generator doesn’t include a built-in hour meter, an inexpensive plug-in or vibration-triggered hour meter (often under $15) is one of the best small investments a new owner can make. It removes all the guesswork from tracking break-in progress and every future maintenance interval.
Keeping a Break-In Log
You don’t need anything elaborate — a note on your phone or a card taped inside the generator’s storage cover works fine. The goal is simply to know, at a glance, whether you’ve hit your break-in hour target and completed the first oil change. This matters more than it sounds like it would, especially if your generator doesn’t have an hour meter and your camping trips are spread out over several months.
| Session | Date | Approx. Hours Run | Load Used | Running Total | First Oil Change Done? |
|---|---|---|---|---|---|
| 1 | |||||
| 2 | |||||
| 3 | |||||
| 4 |
If your generator has a built-in hour meter, use that reading instead of estimating — it removes the guesswork entirely. If it doesn’t, round up rather than down when estimating a session’s length; overestimating slightly and changing the oil a little early causes no harm, while underestimating and delaying the oil change does.
Editorial Tip: Keep a small waterproof notebook — or even an index card in a zip bag — inside the generator’s storage compartment or cover pocket. It’s the one place you’ll actually see it again next time you go camping, which is more than can be said for a note in a phone app you forget existed. Jot down the date of the first oil change as soon as you do it; this is the detail owners most often lose track of once the newness wears off.
Step-by-Step: How to Break In Your Generator
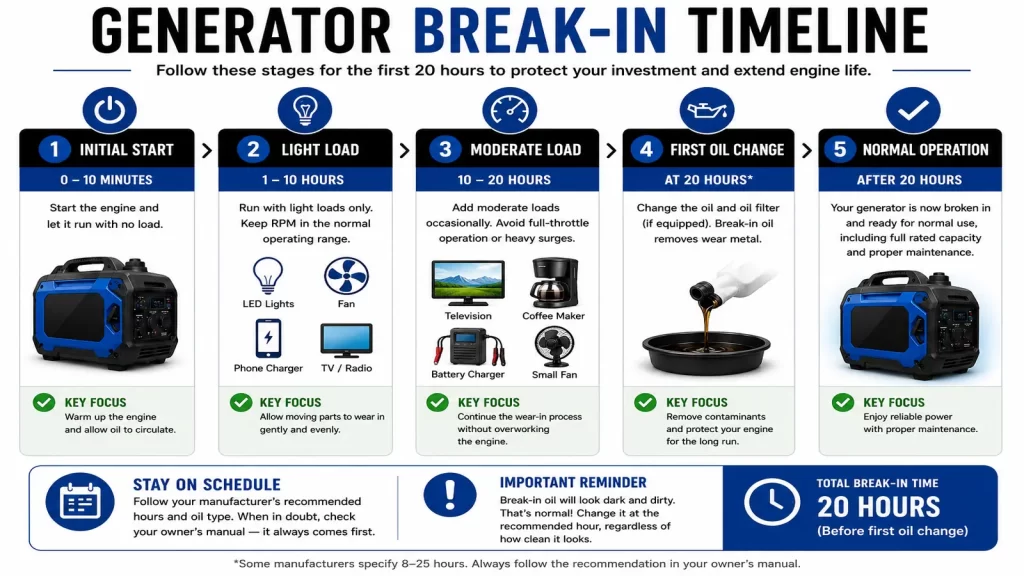
Here’s the entire process at a glance before we walk through each stage in detail:
New Generator
     ↓
Add Oil (correct type & level per manual)
     ↓
Initial Start — 5–10 Minutes, No Load
     ↓
Hours 1–10 — Light Load Only
     ↓
Hours 10–20 — Moderate Load
     ↓
First Oil Change (at manual's specified hour)
     ↓
Normal Operation — Full Rated Capacity
Step 1: First Start (No Load)
Start the generator with nothing plugged in. Let it run at idle or standard operating speed for 5–10 minutes. This gives you a chance to confirm normal operation — steady RPM, no unusual noise, no fuel or oil leaks — before you introduce any load at all.
Step 2: Light Load Running (Hours 1–10)
Once the initial no-load period is complete, begin running the generator under light load. For most inverter and portable generators used with a travel trailer, this means:
- Interior lights
- Phone and device chargers
- A single small fan
- A TV or similar low-draw electronic
Avoid high-draw appliances entirely during this period — no air conditioner, no microwave, no electric water heater element, no hair dryer. The goal is steady, moderate engine work, not maximum output.
Wondering what size generator you’ll need to run your RV air conditioner after break-in? Our guide to the best generators for RV air conditioners explains starting watts, running watts, and how to choose the right generator for your RV.
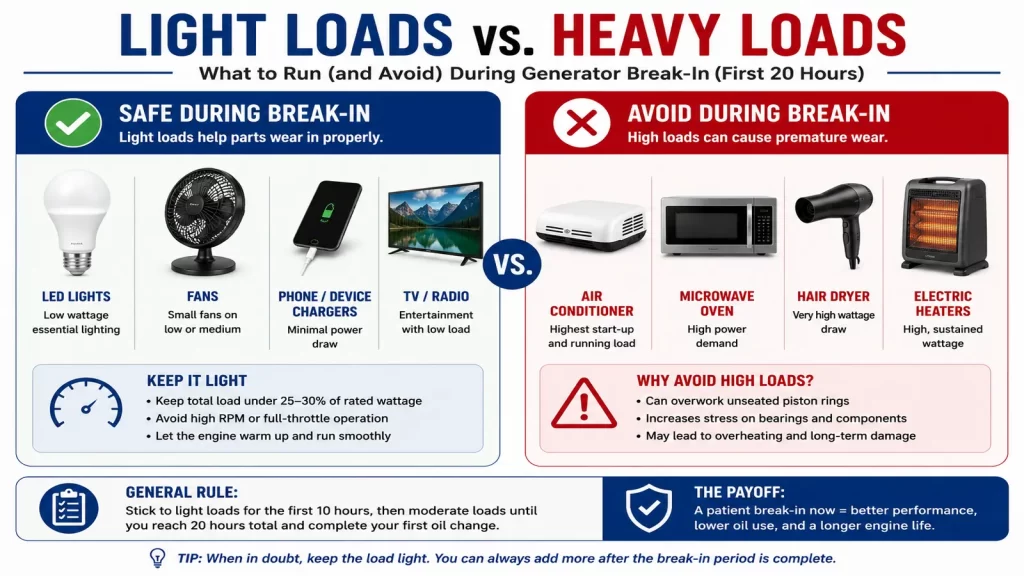
Avoid Full Throttle: Don’t run the generator at its rated maximum wattage during break-in, even briefly. Full-load operation before the rings have seated is one of the most common causes of long-term power loss in small engines.
Weather affects break-in more than most new owners expect — cold mornings need a longer warm-up idle, and hot afternoons make the engine work harder for the same load. Neither is a problem, but it’s worth spreading break-in hours across a few sessions rather than one long run in extreme conditions.
Step 3: Moderate Load Running (Hours 10–20)
In the second half of the break-in period, you can introduce moderate loads — a small window AC unit for short periods, a coffee maker, or similar mid-draw appliances — while still avoiding the generator’s rated maximum. Vary the load somewhat rather than running it at one constant level the entire time; this more closely mimics real-world use and helps components seat evenly.
Step 4: The First Oil Change
At the hour mark specified in your manual — commonly 20 hours, though some manufacturers specify as few as 8 or as many as 25 — change the oil, regardless of how clean it looks. Break-in oil should always be changed on schedule, not “when it looks dirty.” It will often look darker than expected; that’s the metal particulate you’re supposed to be removing.
Run the engine for a few minutes first so the oil is warm and flows out fully. Use the oil type and quantity your manual specifies. Many owners switch to a full synthetic 10W-30 or 5W-30 at this point, though a straight 10W-30 conventional oil is standard for the break-in fill itself in most manuals — confirm both fills in your specific manual, since this is one of the more common points of confusion.
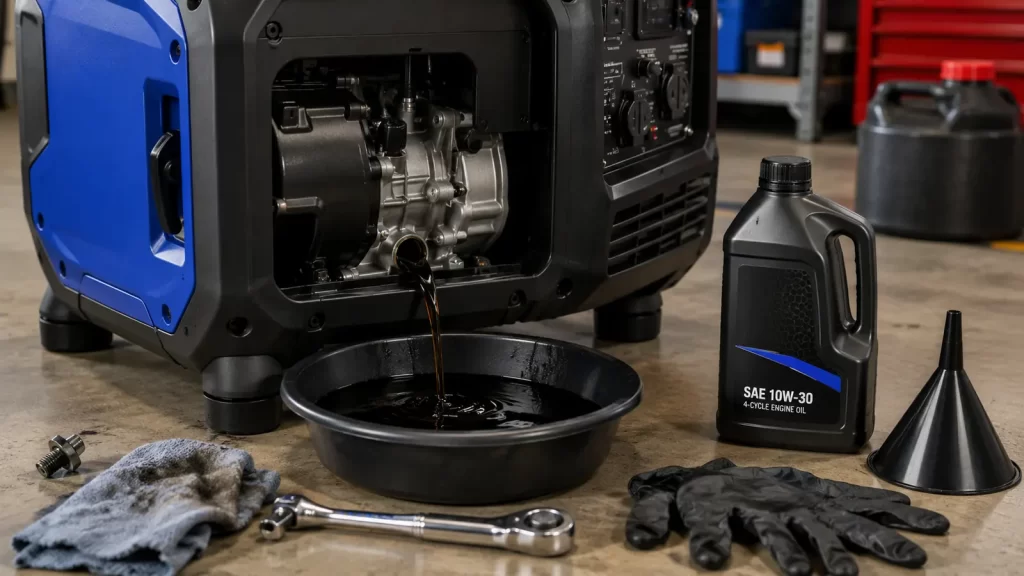
Editorial Tip: Once you’ve changed the oil, write the next service hour directly on the generator with a paint marker or a piece of tape on the control panel — something like “Next oil change: 100 hrs.” It’s a small habit, but it’s the difference between a maintenance schedule you actually follow and one you mean to follow.
Step 5: Return to Normal Operation
After the first oil change, the engine is broken in. From here forward, you can run the generator at its rated capacity, including the RV air conditioner, following the sizing guidance in our generator sizing guide. Shift to your manufacturer’s normal maintenance schedule for subsequent oil changes, typically every 50–100 hours or annually, whichever comes first.
In short: no load for the first few minutes, light load for about 10 hours, moderate load for another 10, then an oil change — after that, the generator is ready for full duty, including your RV’s air conditioner. Now that your generator is fully broken in, use our RV Generator Calculator to confirm it has enough capacity for your trailer’s appliances before your next camping trip.
Generator Break-In Timeline at a Glance
| Stage | Hours | Load Level | What to Run | First Oil Change? |
|---|---|---|---|---|
| Initial Start | 0–0.2 (5–10 min) | None | Nothing plugged in | No |
| Light Break-In | 1–10 hours | Light | Lights, small fan, chargers, TV | No |
| Moderate Break-In | 10–20 hours | Moderate | Small AC briefly, coffee maker, mixed loads | No |
| Break-In Complete | At manual’s specified hour (commonly ~20) | N/A | N/A | Yes — change oil now |
| Normal Operation | After first oil change | Full rated capacity | RV air conditioner, full appliance load | Follow manufacturer’s regular interval |
Hours and intervals shown are common industry defaults for small air-cooled portable and inverter generators. Confirm the exact figures for your model in the owner’s manual before relying on this table.
Break-In Recommendations by Manufacturer
Break-in fundamentals — light load, no full throttle, a mandatory first oil change — are consistent across nearly every small-engine generator brand. What varies is the exact hour count, the specified oil weight, and how each manufacturer documents the process. Rather than guess at numbers we can’t verify against a current manual, the table below tells you what to check for with each brand and points you to the manual as the final word.
| Brand | General Approach | Where Break-In Specs Vary | Final Authority |
|---|---|---|---|
| Honda | Documented in the owner’s manual with a specific initial-oil-change hour and a defined load-limit period. | Exact hour count and oil weight differ by engine displacement (e.g., EU2200i vs. larger models). | Refer to the owner’s manual. |
| Champion | Typically outlines an initial oil-change interval and load guidance in the printed manual. | Dual-fuel models may specify gasoline-first break-in; verify per model. | Refer to the owner’s manual. |
| Westinghouse | Manuals generally include a first-service interval and general load guidance for the break-in window. | Inverter vs. conventional Westinghouse models may differ in specified hours. | Refer to the owner’s manual. |
| WEN | Break-in guidance is included in the product manual, with a specified first-oil-change interval. | Interval and oil type can differ across WEN’s inverter and open-frame lineups. | Refer to the owner’s manual. |
| Predator (Harbor Freight) | Manuals typically specify an initial break-in period with a defined first-oil-change hour. | Figures vary meaningfully across Predator’s different engine sizes. | Refer to the owner’s manual. |
| Generac (portable models) | Portable Generac units document a break-in and initial service interval in the owner’s manual. | Consumer portable models and larger models are documented separately — don’t cross-reference between them. | Refer to the owner’s manual. |
Why We Won’t List Exact Hours Here: Manufacturers periodically update their recommended intervals across model years and engine revisions, and specs differ meaningfully even within a single brand’s lineup. Publishing a specific number here that doesn’t match your exact model’s current manual would do more harm than good. The one number that’s always correct is the one printed in the manual that shipped with your unit.
Quick summary: every major brand builds a break-in period and a first oil change into their maintenance requirements — the core process in this guide applies across all of them. The only thing that changes brand to brand is the exact hour count and oil specification, and that always comes from your model’s manual, not a general guide like this one.
Common Break-In Mistakes RV Owners Make
Running the AC on day one. This is the single most common mistake, and it’s an understandable one. A new travel trailer owner wants to test the generator under real conditions immediately — often on the very first camping trip after buying it — but the RV air conditioner is exactly the high-draw, high-surge load that break-in guidance says to avoid. If your first trip is scheduled soon after the purchase, plan a short driveway break-in session beforehand rather than trying to complete it at the campsite under time pressure.
Skipping the first oil change because the generator “seems fine.” A generator can run smoothly while still doing long-term damage — the first oil change is part of the engine’s manufacturing process, not optional maintenance. This mistake is usually passive rather than deliberate: the generator goes back in storage after the trip, and the oil change quietly never happens. The notebook habit mentioned earlier closes that gap.
Using the wrong oil. Automotive oil isn’t automatically wrong, but concentration, weight, and additive packages matter for small air-cooled engines. Use what the manual specifies.
Letting the generator sit unused for weeks with old fuel in the tank, then breaking it in on stale gas. This causes hard starting that owners sometimes mistake for a mechanical problem, when it’s really a fuel issue — a stabilizer added at fill-up prevents it if there’s any delay between purchase and first use.
Assuming all generators use the same break-in period. Inverter generators, conventional portables, and larger dual-fuel units don’t always share identical requirements. Different generator types suit different RV setups, and their break-in specifics can differ too.
Safety Note: Never run any generator — during break-in or afterward — inside an enclosed space, under an RV, in a garage, or close enough to windows and vents that exhaust can enter the living space. Carbon monoxide from small engines is odorless and can be fatal in minutes. For more information on safe placement, extension cords, carbon monoxide protection, and campground best practices, see our complete Generator Safety Checklist.
Troubleshooting During Break-In
A little roughness during the first few hours isn’t unusual, but a few specific symptoms are worth knowing how to read.
Hard starting. Most often caused by stale fuel, a choke that isn’t being used correctly on a cold start, or occasionally a loose spark plug wire from shipping. Rarely a break-in issue itself.
Surging or uneven idle. Small engines commonly surge slightly when new, especially inverter models with idle-control features, as the carburetor and governor settle in. Persistent surging beyond the first hour or two is worth checking against your manual’s troubleshooting section rather than assuming it will resolve on its own.
A slight burning smell in the first hour. Some new-engine smell from paint, packing oil, or minor dust burning off the muffler is normal for a short period. A smell that persists well beyond the first 15–20 minutes, or that’s accompanied by visible smoke, is not — shut the unit down and consult your manual or dealer.
Oil looking dark before the scheduled change. This is expected, not a warning sign. It’s evidence the break-in process is doing exactly what it’s supposed to do.
Quick summary: hard starting is usually fuel-related, mild surging is normal on a new inverter engine, a brief new-engine smell is normal, and dark break-in oil is expected — not a sign of a problem. Persistent rough running, knocking, or smoke is the exception, and it warrants a stop.
Tip: If anything feels genuinely wrong — knocking, grinding, a sudden loss of power, or overheating — stop the generator and troubleshoot before continuing, rather than pushing through the remaining break-in hours. A real mechanical problem won’t fix itself by continuing to run the unit.
If a rough-running issue does persist past the first hour or two, it’s occasionally traced back to something simple like a fouled spark plug from shipping residue, or in rare cases a carburetor that needs attention before it’s ever been run.
Break-In for Different Generator Types
Small inverter generators (2,000–3,500 watts). These are the most common choice for travel trailer owners running lights, electronics, and a single small AC unit. Break-in periods are typically shorter (often around 10–20 hours) given their smaller engines, but always confirm with the manual.
Mid-size portable and dual-fuel generators (3,500–5,500 watts). Larger engines sometimes call for slightly longer break-in windows and may specify different oil weights for gasoline versus propane operation — see the fuel note below if you’re running a dual-fuel model.
Larger towable or permanently mounted units (7,000+ watts). These are less common for travel trailers specifically but follow the same core principles — no full load during break-in, and a mandatory first oil change on schedule.
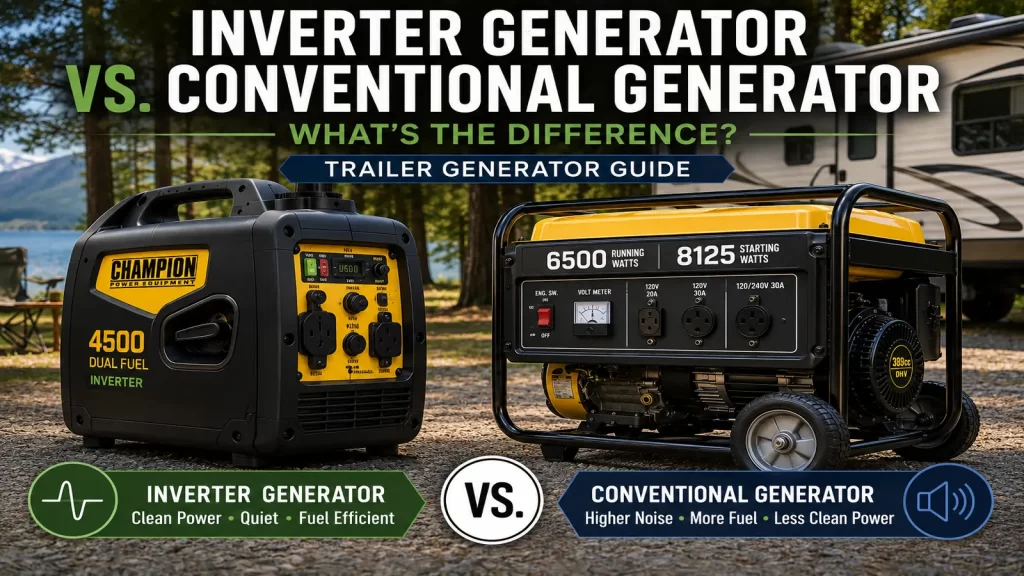
Learn the difference between an inverter and conventional generators before choosing one.
If you’re still deciding which generator to buy, see our comparison of the best portable generators for travel trailers, where we review quiet inverter models, dual-fuel generators, and larger portable units.
A Note on Fuel Choice During Break-In
Fuel quality matters more during break-in than at any other point in a generator’s life, simply because the engine has less established tolerance for anything less than ideal combustion. A few practical points:
- Fresh gasoline only. Fuel that’s been sitting in a can for months loses octane and picks up moisture, both of which make for a rougher, less consistent break-in.
- Avoid E15 and higher ethanol blends unless your manual explicitly approves them. Higher ethanol content can affect small-engine carburetors and fuel lines in ways manufacturers don’t always warranty.
- Dual-fuel units should break in on gasoline first. Gasoline combustion tends to provide slightly better lubrication during the wear-in period than propane, which is part of why most manufacturers recommend it as the break-in fuel even for units you plan to run mostly on propane afterward.
- Add a fuel stabilizer if there’s any gap between the break-in period and your next trip. This has nothing to do with break-in mechanics directly, but a generator that sits with untreated fuel between the break-in period and its first real camping use can develop starting problems that look like break-in issues but aren’t.
Choosing the right fuel is only one part of proper generator maintenance. Using the correct engine oil is equally important, especially after the initial break-in period.
How Break-In Connects to Long-Term Generator Care
Break-in is the first chapter of a much longer maintenance story. Once your generator is broken in, ongoing care — regular oil changes, fuel stabilization during storage, air filter checks, and seasonal startup procedures — determines how many years of service you get from it. Once your generator is broken in, proper storage becomes the next priority. Our How to Store a Generator for Winter guide explains how to stabilize fuel, prevent carburetor problems, and prepare your generator for the off-season.
If you’d rather have a simple printed reference to keep with the generator instead of scrolling back through this guide at the campsite, here’s the process condensed into a one-page checklist:
Download our free printable Generator Break-In & First Maintenance Log (PDF).
- [ ] Add oil (correct type and level per manual)
- [ ] Inspect generator (air filter, fuel lines, connections)
- [ ] Use fresh fuel
- [ ] Initial startup — no load, 5–10 minutes
- [ ] Light load period — approx. hours 1–10
- [ ] Moderate load period — approx. hours 10–20
- [ ] First oil change (at manual’s specified hour)
- [ ] Record the date and hour reading in a maintenance log
- [ ] Ready for full operation, including RV air conditioner
Print it, tuck it in the generator’s storage compartment, and check items off by hand as you go.
Frequently Asked Questions
How many hours does it take to break in a generator?
Most small portable and inverter generators specify around 20 hours of light-to-moderate running before the first oil change, though some manufacturers specify as few as 8 hours. Check your owner’s manual for the exact figure for your model.
Can I run my RV air conditioner during break-in?
It’s best to avoid it. The AC’s starting surge and sustained draw represent close to the generator’s maximum output, which is exactly the kind of load break-in guidance says to avoid during the first several hours of operation.
What happens if I accidentally run the generator at full load during break-in?
A single brief instance isn’t necessarily catastrophic, but repeated full-load running before the rings have seated increases the risk of long-term oil consumption and reduced power. Return to light loads for the remainder of the break-in period and complete the first oil change on schedule.
Do I need special break-in oil?
Most manufacturers don’t require a specialty break-in oil — a standard conventional oil in the weight they specify is typical for the break-in fill. Some owners switch to full synthetic after the first oil change. Confirm both fills in your manual.
Is break-in different for a brand-new generator versus one that’s been sitting in storage at a dealer?
The break-in process itself is the same, but a unit that’s been sitting for a while should get a fuel system check and fresh fuel before starting, since old fuel can cause hard starting that’s easy to mistake for an engine problem.
Does break-in apply to solar generators or battery power stations?
No. Break-in is specific to engines with moving parts. Battery-based power stations and solar generators have no combustion engine and no break-in requirement.
How do I know when break-in is complete?
Break-in is complete once you’ve reached the hour mark your manual specifies and performed the first oil change. There’s no other test needed — it isn’t something you can judge by how the generator sounds or feels.
Can I use my generator for short trips during the break-in period, or does it need to be one continuous run?
Multiple shorter sessions that add up to the required hours are fine and, for most RV owners, more realistic than one long continuous run. What matters is the cumulative hours and load level, not whether it happens in one sitting.
Is it safe to break in a generator at high altitude or in cold weather?
Yes, with the same load restrictions. Cold weather may make starting slightly harder, and high altitude reduces power output somewhat, but neither changes the fundamental break-in process. Follow your manual’s cold-weather starting instructions if provided.
Will skipping break-in void my warranty?
It can — many manufacturers exclude damage traceable to improper break-in. Keep your receipt and note the date and hour reading when you perform the first oil change, in case you need to reference it later.
Editor’s Recommendation
If your first camping trip is only a few days away, complete the break-in process at home before leaving. Spending one afternoon running the generator, completing the first oil change, and confirming everything works properly is far easier than troubleshooting problems at the campground.
The Bottom Line
Twenty hours of careful running and one oil change stand between a generator that lasts a decade and one that underperforms from year one. It’s a small time investment for a piece of equipment that’s often the single most expensive component of a travel trailer’s power setup. Follow your manual’s specific numbers, keep the load light for the first stretch of running time, and don’t skip that first oil change — even if the generator seems to be running perfectly.
This guide reflects common manufacturer break-in practices for small air-cooled portable and inverter generators. Always defer to your specific model’s owner’s manual, which reflects the exact tolerances and testing your manufacturer used.
Continue Learning About RV Generators
If you’re new to portable generators, these guides will help you get the most from your equipment:
- What Size Generator Do I Need for a Travel Trailer?: Learn how to match your generator to your RV’s electrical needs.
- RV Generator Calculator: Estimate your running and starting watt requirements in minutes.
- Generator Safety Checklist: Learn safe placement, carbon monoxide precautions, and campground best practices.
- Best Portable Generators for Travel Trailers: Compare quiet inverter generators for every budget.